Mybatis
Java笔记——Mybatis
🛴我的第一个Mybatis程序
1、创建数据库
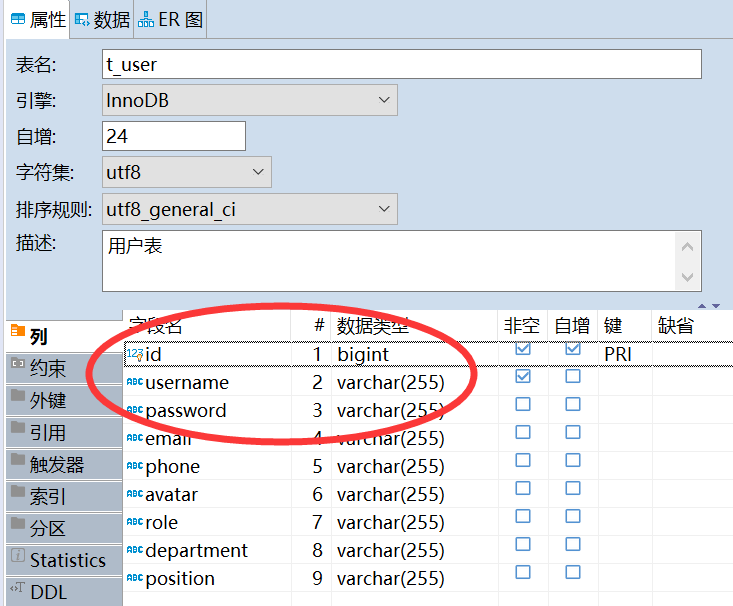
这是之前我做设计模式课设中建的一张表,下面我们就来查询这这张表中所有的记录,为了方便,就只查下前3个属性吧。
2、创建maven项目
删除src目录;
导入依赖:mysql、mybatis、junit
3、创建子模块module
同样选择maven项目,这样后面的再次创建maven项目时可以直接从父项目继承配置项。
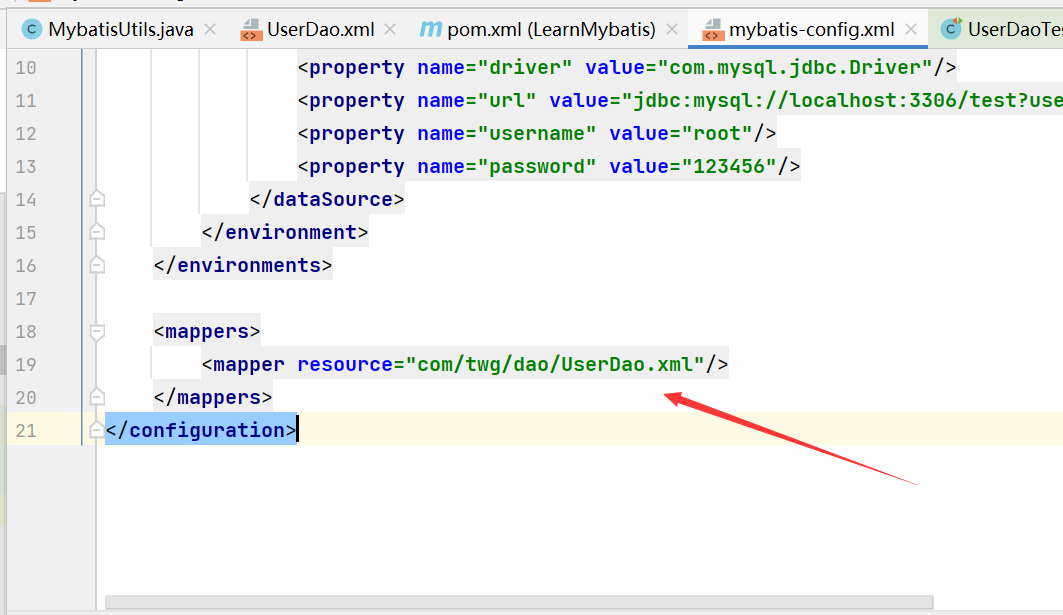
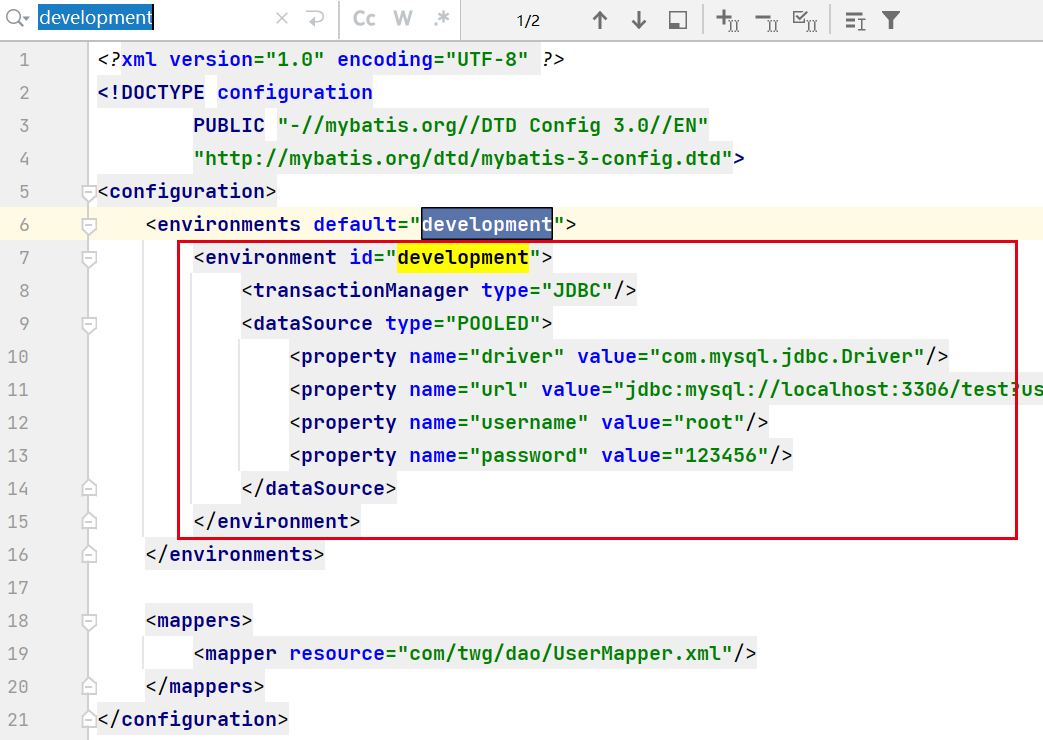
4、编写mybatis核心配置文件
1 | |
5、编写mybatis工具类
1 | |
6、编写代码
实体类
1
2
3
4
5
6
7
8
9
10
11
12
13
14
15public class User {
private int id;
private String username;
private String password;
public User() {
}
public User(int id, String username, String password) {
this.id = id;
this.username = username;
this.password = password;
}
}DAO
1
2
3
4
5
6
7
8package com.twg.dao;
import com.twg.entity.User;
import java.util.List;
public interface UserDao {
List<User> getUserList();
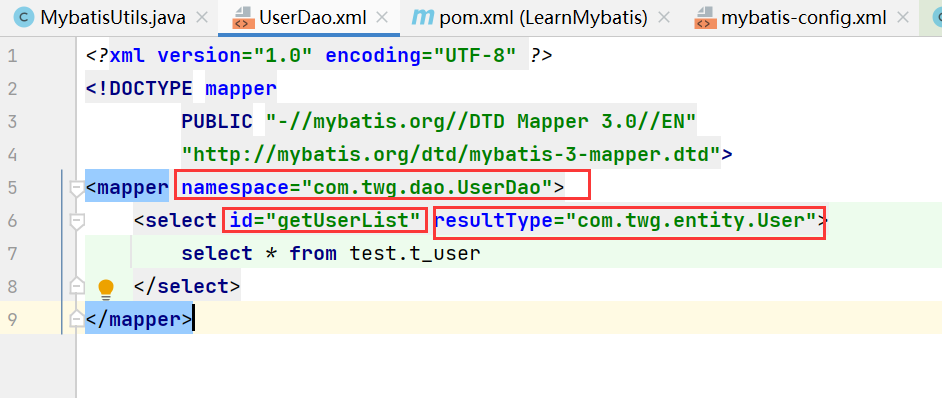
}DAO持久层映射文件,由原来的UserDaoImpl类转变成一个Mapper配置文件
1
2
3
4
5
6
7
8
9<?xml version="1.0" encoding="UTF-8" ?>
<!DOCTYPE mapper
PUBLIC "-//mybatis.org//DTD Mapper 3.0//EN"
"http://mybatis.org/dtd/mybatis-3-mapper.dtd">
<mapper namespace="com.twg.dao.UserDao">
<select id="getUserList" resultType="com.twg.entity.User">
select * from test.t_user
</select>
</mapper>特别注意:
namespace:指定(绑定)了DAO接口的位置;
id:为namespace所绑定的接口中的方法名;
resultType:指定了id所绑定的方法的返回值类型,如果是返回一个集合,则这里写集合中元素的类型;
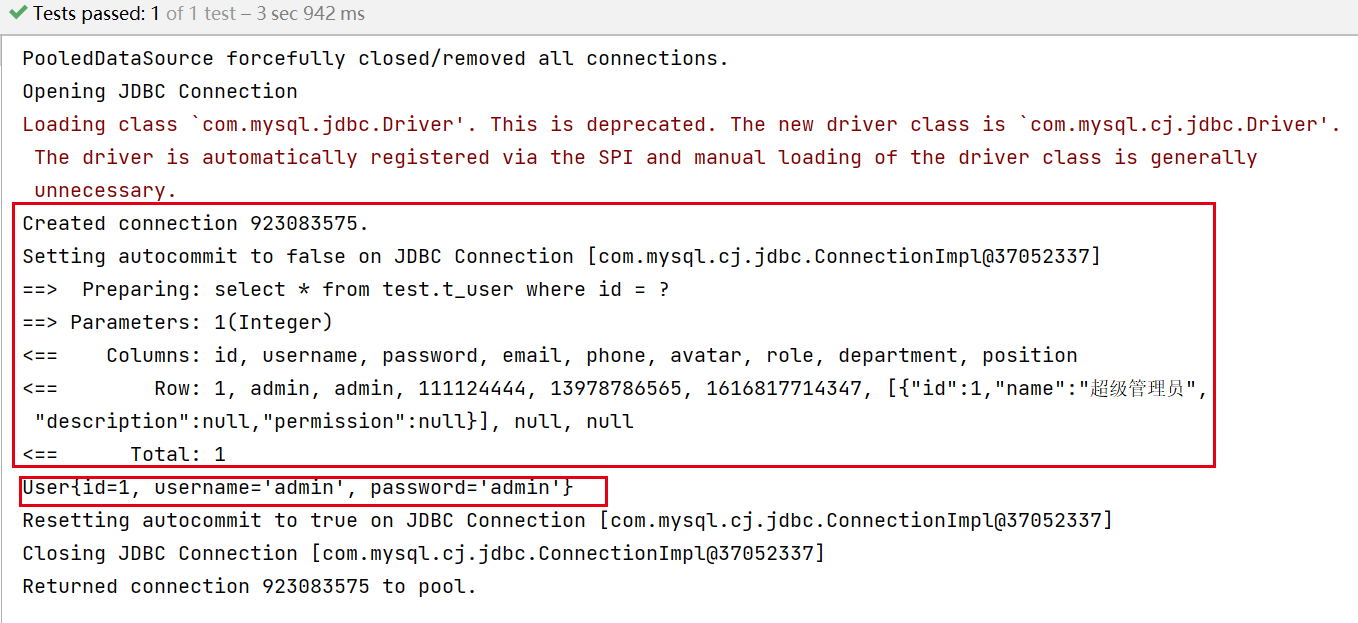
7、测试
1 | |
8、可能会遇到的问题
映射文件没有在mybatis主配置文件中注册
构建项目后,找不到映射文件
- 在porn.xml中配置resources,来防止资源导出异常;
- 也可以直接将映射文件放到resources目录下;
映射文件中的参数一定要写对
- namespace:表明这个映射文件所绑定的接口类是哪个
- id:绑定接口中的哪个方法,方法名一定要和接口中定义的名字一样
- resultType:表明返回值类型
🛫解锁其它姿势——CRUD
回顾下通过mybatis写一个接口的流程
在Mapper中定义一个抽象方法
在映射文件(XXMapper.xml)中绑定这个方法
进行测试/使用,注意如果是增删改需要提交事物(”sqlSession.commit();”)
看看在映射文件中还可以写哪些标签
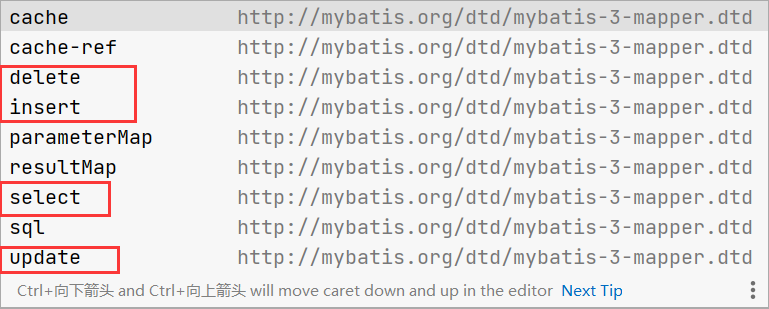
增
1
2
3
4
5
6/**
* 向用户表中插入一条记录
* @param user:
* @return 新增加的记录的id
*/
int inserUser(User user);1
2
3
4<insert id="inserUser" parameterType="com.twg.entity.User">
insert into test.t_user (username, password)
values (#{username}, #{password})
</insert>删
1
2
3
4
5
6/**
* 通过指定id删除一条用户表记录
* @param id
* @return
*/
int delUser(int id);1
2
3
4
5<delete id="delUser">
delete
from t_user
where id = #{id};
</delete>改
1
2
3
4
5
6/**
* 更新一条用户表信息
* @param user
* @return
*/
int updateUser(User user);1
2
3
4
5
6<update id="updateUser" parameterType="com.twg.entity.User">
update t_user
set username = #{username},
password=#{password}
where id = #{id};
</update>查
1
2
3
4
5
6/**
* 根据ID查询用户
* @param id:用户的id
* @return 返回指定用户id的信息
*/
User getUserById(int id);1
2
3
4
5<select id="getUserById" resultType="com.twg.entity.User">
select *
from test.t_user
where id = #{id}
</select>
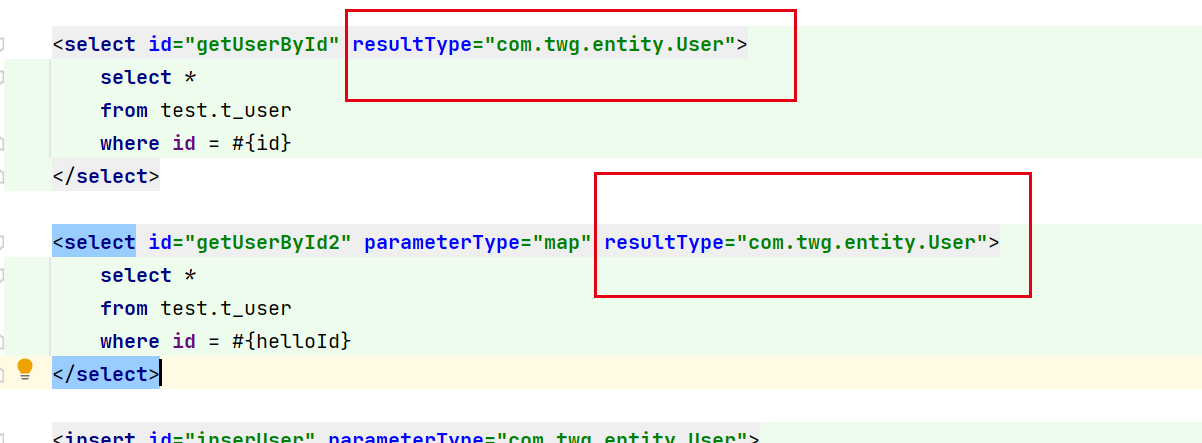
🎁万能的Map
当实体类的属性过多时(表的字段太多),可以考虑使用Map。
1 | |
1 | |
1 | |
🎭模糊查询
为了防止SQL注入,注意在传入参数时将参数写si.
1 | |
1 | |
🍀环境配置
环境配置
Mybatis可以配置多个环境,但是每个SqlSessionFactory只能选择一种。
默认事物管理器——JDBC
连接池——POOLED
属性
可以通过properties属性来应用配置文件。
这些属性都是可以替换了,例如.properties文件

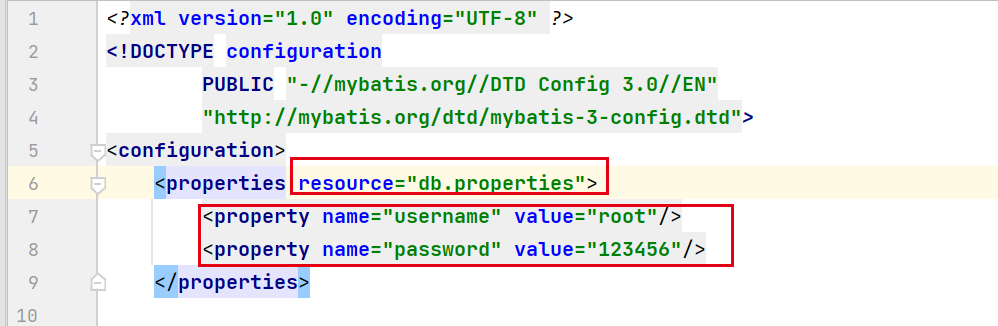
可以通过引入外部配置文件来确定参数,也可以通过
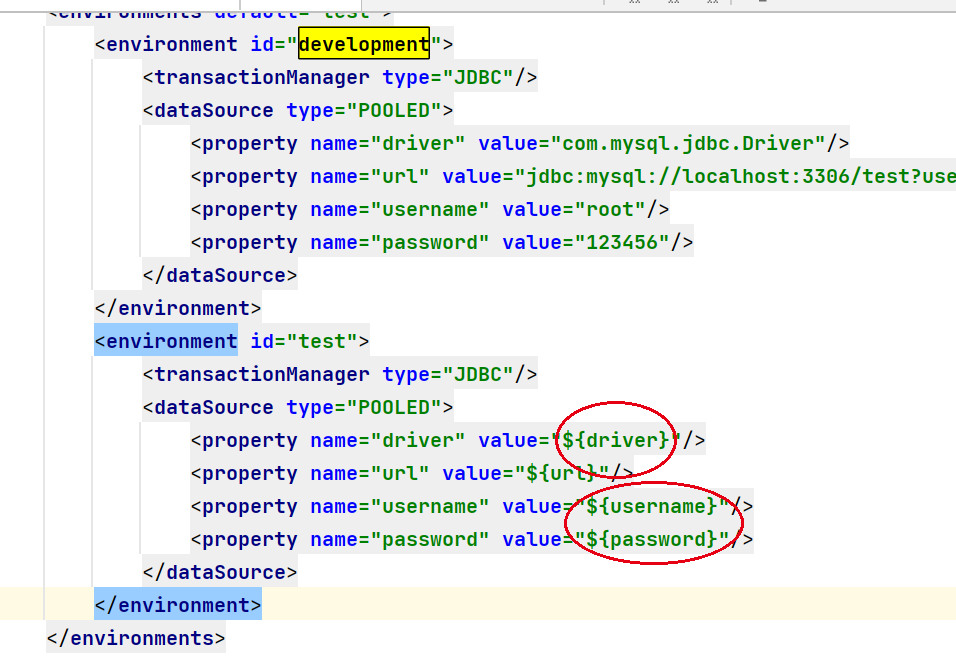
配置好参数,就可以通过 ${ } 的方式使用了。
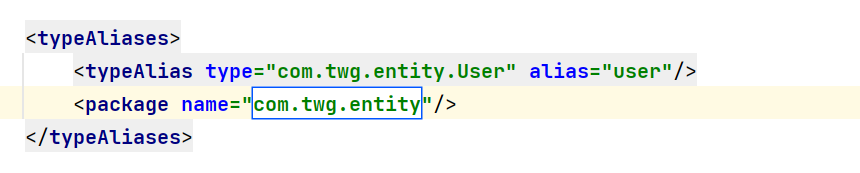
类型别名
为什么要取别名?——为了简洁
下面这些返回值类型、参数类型写的太长了,也容易出错。
2种解决办法:
- 给实体类取别名
- 给实体类的包取别名,这里自动自动将别名取成,这个包中类名,并将首字母小写。如果需要改成别的名字,在实体类上加上注解@Alias(“xxx”)
映射器
绑定映射文件。
- 通过指定资源目录——推荐✨
1 | |
- 下面两种有限制:
- 接口和其配置文件需要在同一包下
- 需要同名
1 | |
1 | |
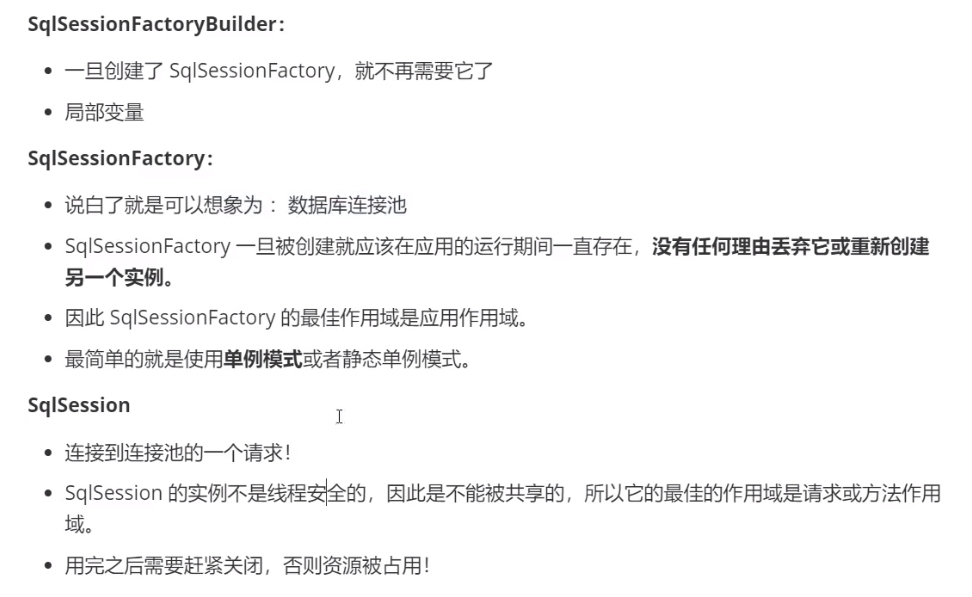
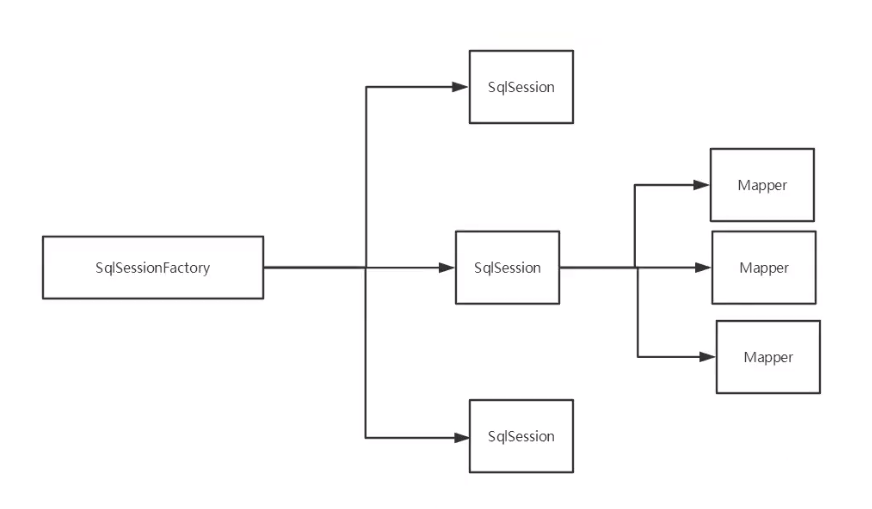
生命周期和作用域
🎗解决属性名与字段名不一致的问题
问题:当属性名与字段名不一致时,查询出来的结果会显示“null”
例如,在表中密码字段是pwd,但是我在实体类中的属性写的是password.
解决:
起别名
1
2
3
4
5<select id="getUserById" resultType="com.twg.entity.User">
select id,name,pwd as password
from test.t_user
where id = #{id}
</select>resultMap
结果集映射
📃日志
当代码出现异常,需要排错时,日志就是最好的工具!
以前:手动输出,打印
现在:日志工厂
1 | |
Log4j
也是一种日志,是Apache的一个开源项目,通过他可以控制日志的输出格式,日志的输送目的地、日志的级别等。
1、导入log4j依赖
1 | |
2、添加log4j.properties配置文件
1 | |
3、配置mybatis
1 | |
📑分页
为什么需要分页——数据太多,不方便处理
之前:通过SQL中的limit
1 | |
现在:mybatis实现
⚙使用注解
1 | |

同样,使用注解这种方式,也需要在配置文件中注册mapper。
当存在多个参数时,每个参数前面必须加上@param()注解
- 基本数据类型、String需要加上
- 应用类型不需要
- 只有一个参数可以不用
- 在sql中引用的就是@param中填写的参数
1 | |
🎈Lombok
使用Lombok,可以不必再写哪些死板的getter、setter方法了。
但是:舍弃了一定规范,得到了一些便利。
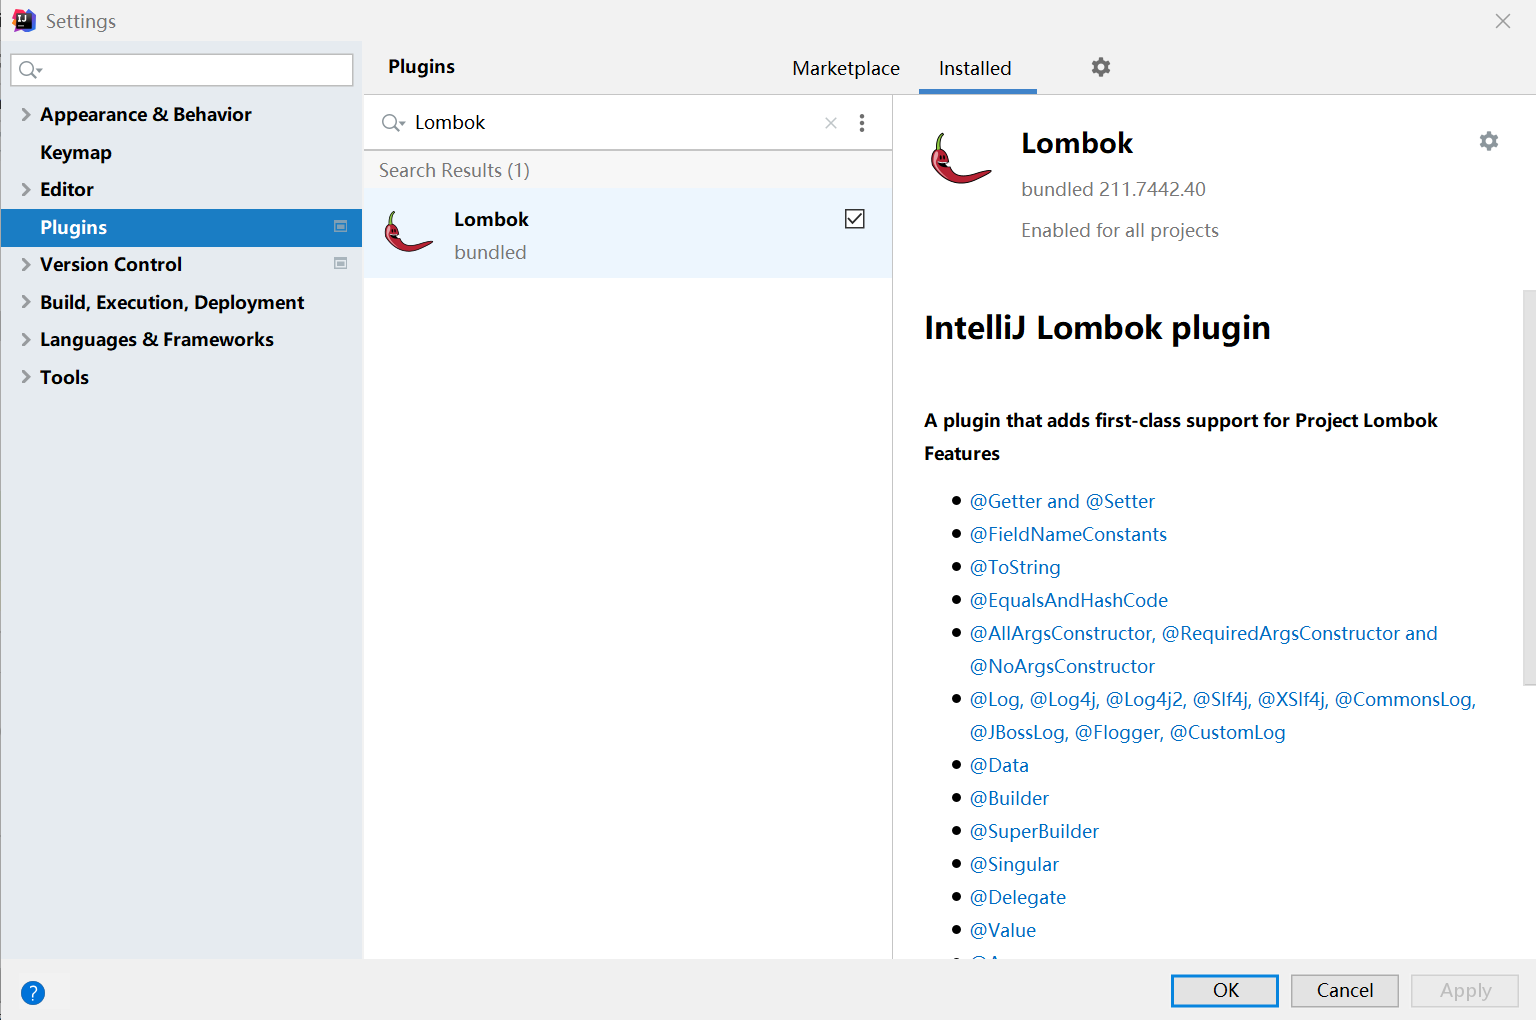
idea安装Lombok插件
导入依赖
1
2
3
4
5
6<dependency>
<groupId>org.projectlombok</groupId>
<artifactId>lombok</artifactId>
<version>RELEASE</version>
<scope>compile</scope>
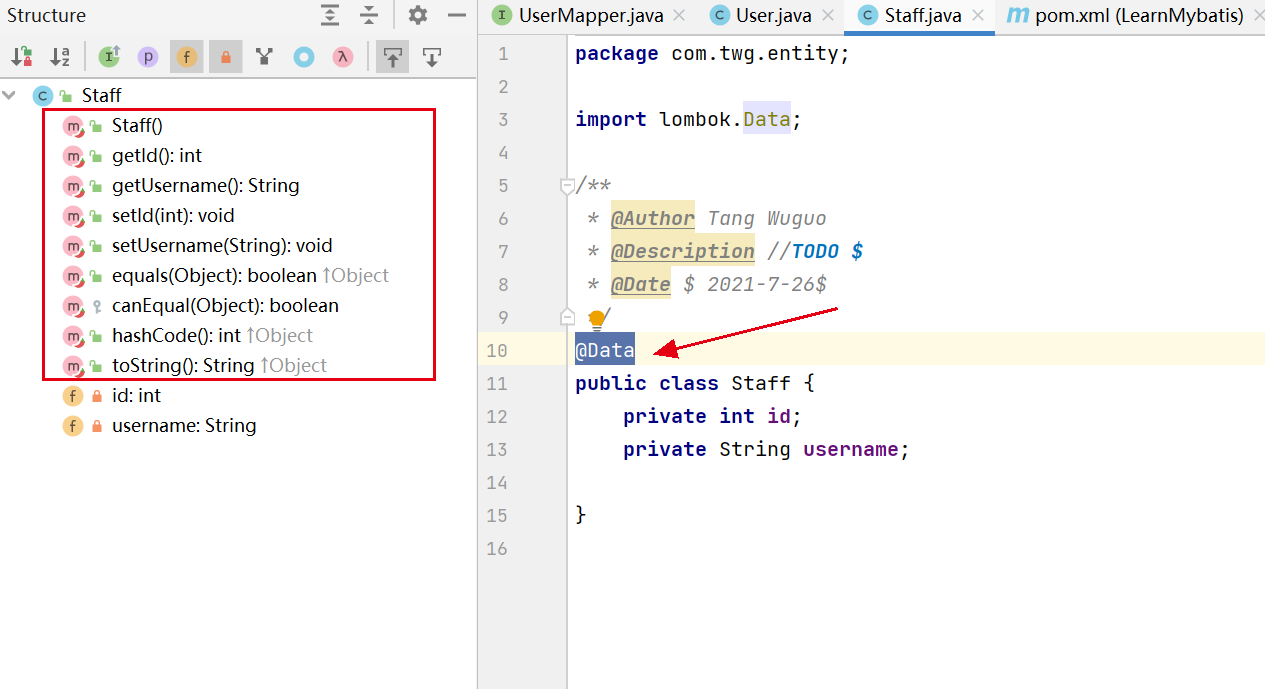
</dependency>使用注解@Data
🏐动态SQL
what:根据不同的条件生成不同的SQL语句
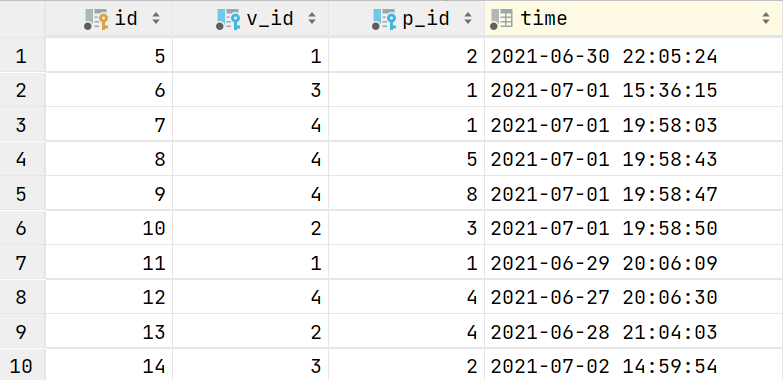
在实际的应用中常常通过指定多个条件来查询,例如,这里有一张购买记录表,我需要可以指定VIP的id(v_id),产品的id(p_id)以及购买时间来查询,当用户没有指定某个条件时,查询时就不对这个字段进行限制,这里就可以通过动态SQL来实现。
官网中给了这样一些标签
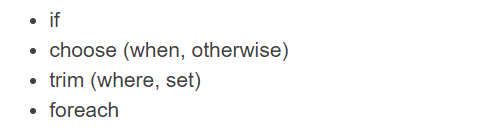
if
编写接口
接口中有一个Map参数,是为了指定查询条件。
1
2
3
4
5
6
7
8public interface BuyProductMapper {
/**通过多个条件,查询BuyProduct表
* @param map
* @return
*/
public List<BuyProduct> getBuyIf(Map map);
}编写mapper
为了实现动态的SQL,这里主要是使用了
标签,当我们传的map参数中,存在某个key,就在原先的SQL语句后面拼接查询条件。 1
2
3
4
5
6
7
8
9
10
11
12
13
14
15
16
17
18<?xml version="1.0" encoding="UTF-8" ?>
<!DOCTYPE mapper
PUBLIC "-//mybatis.org//DTD Mapper 3.0//EN"
"http://mybatis.org/dtd/mybatis-3-mapper.dtd">
<mapper namespace="com.twg.dao.BuyProductMapper">
<select id="getBuyIf" parameterType="map" resultType="BuyProduct">
select * from test.buyproduct where 1=1
<if test="v_id != null">
and v_id = #{v_id}
</if>
<if test="p_id != null">
and p_id = #{p_id}
</if>
<if test="time != null">
and time > #{time}
</if>
</select>
</mapper>测试
1 | |
map:{“time”,”2021-7-1”}
可以看到查询到了所有时间在2021-7-1之后的记录
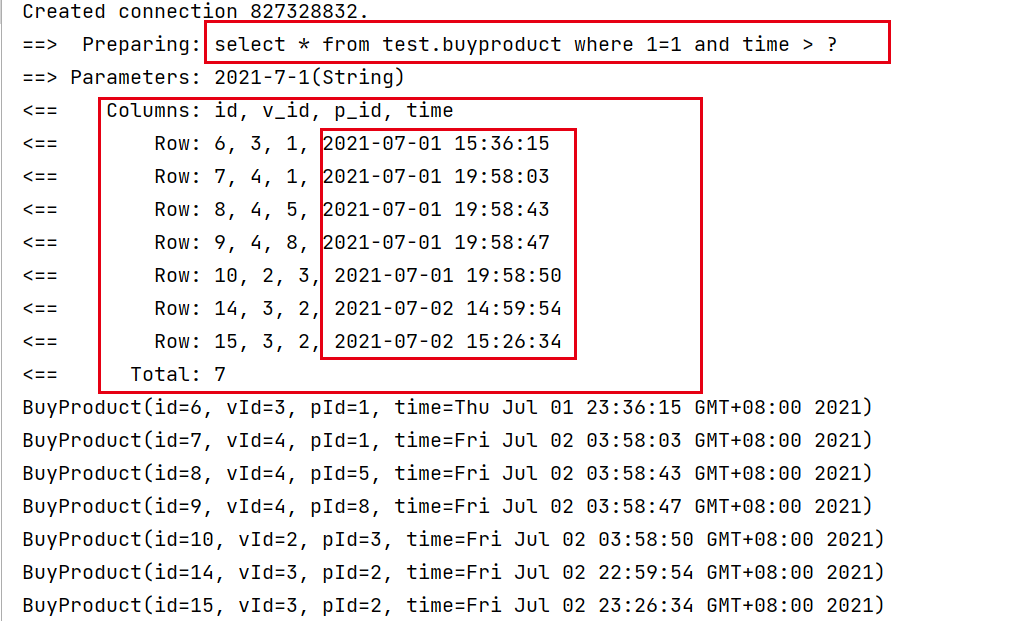
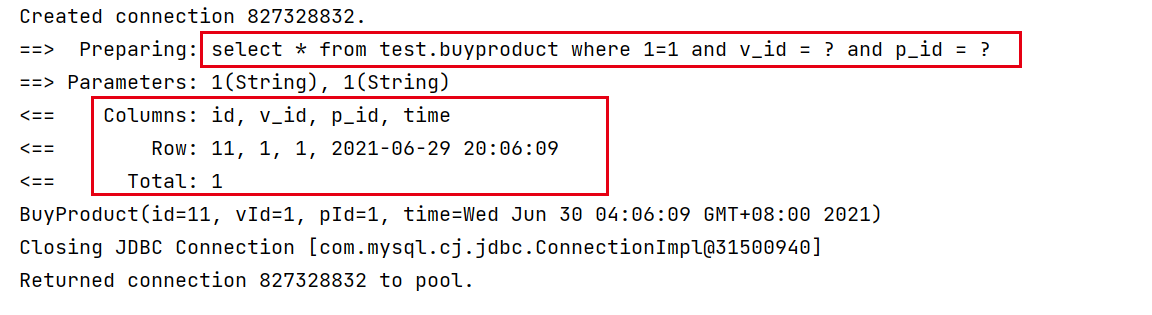
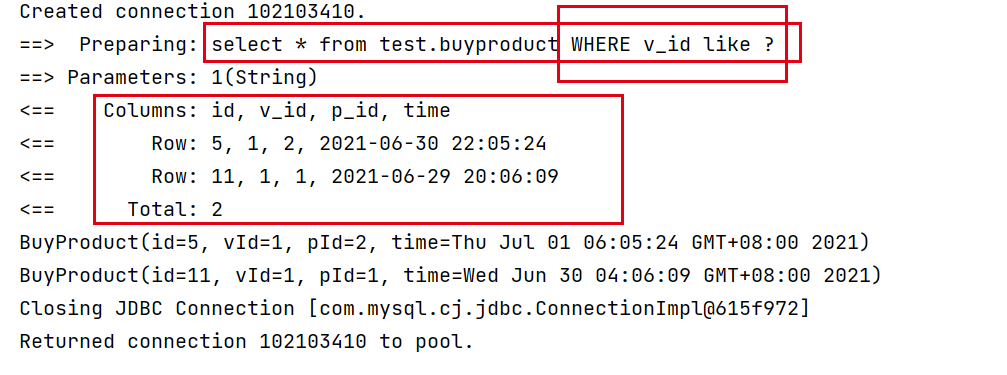
map:{(“v_id”,”1”), (“p_id”,”1”)}
通过指定用户id和产品id,我们查询到了一条数据
choose、when、otherwise
有时候,我们不想使用所有的条件,而只是想从多个条件中选择一个使用。针对这种情况,MyBatis 提供了 choose 元素,它有点像 Java 中的 switch 语句。
接口
1
2
3
4
5
6/**
* 从多个条件中选取一个来查询购物记录
* @param map
* @return
*/
public List<BuyProduct> getBuyChoose(Map map);mapper
1
2
3
4
5
6
7
8
9
10
11
12
13
14
15
16<select id="getBuyChoose" parameterType="map" resultType="BuyProduct">
select * from test.buyproduct
<where>
<choose>
<when test="v_id">
and v_id like #{v_id}
</when>
<when test="p_id">
and p_id like #{p_id}
</when>
<otherwise>
and time >= CURDATE()
</otherwise>
</choose>
</where>
</select>这里我使用了
1
2
3<trim prefix="WHERE" prefixOverrides="AND |OR ">
...
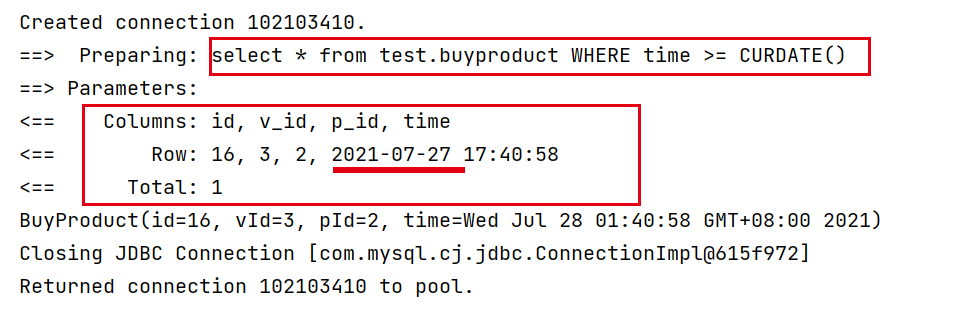
</trim>测试
1 | |
- 当map为空时,根据配置文件中写的sql,他会默认添加
中的条件,也就是默认查询到今天的购买记录。
map:{(“v_id”,”1”), (“p_id”,”1”)}
由于choose、when、otherwise类似于Java中的switch语句,哪怕我这里给出了两个查询条件,它根据我们写的mapper,它会优先取v_id作为条件,所以查询出了下面这些记录。
trim、where、set
where 元素只会在子元素返回任何内容的情况下才插入 “WHERE” 子句。而且,若子句的开头为 “AND” 或 “OR”,where 元素也会将它们去除。
如果 where 元素与你期望的不太一样,你也可以通过自定义 trim 元素来定制 where 元素的功能。比如,和 where 元素等价的自定义 trim 元素为:
1 | |
set 元素会动态地在行首插入 SET 关键字,并会删掉额外的逗号(这些逗号是在使用条件语句给列赋值时引入的)。
来看看与 set 元素等价的自定义 trim 元素吧:
1 | |
foreach
1 | |
foreach元素的功能非常强大,它允许你指定一个集合,声明可以在元素体内使用的集合项(item)和索引(index)变量。它也允许你指定开头与结尾的字符串以及集合项迭代之间的分隔符。
🌊缓存
将数据缓存到内存中,提高访问速度。
- 一级缓存(本地缓存)——默认,sqlSession域
- 二级缓存——namespace
- 自定义缓存
一级缓存
与数据库同一次会话期间查询到的数据会放在本地缓存中;
之后再次查询时会直接从缓存中获取;
1 | |
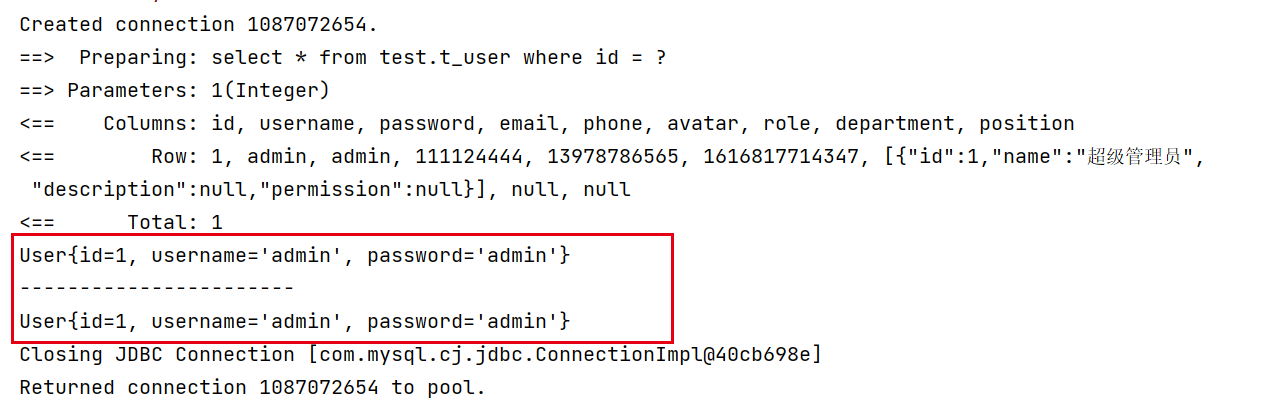
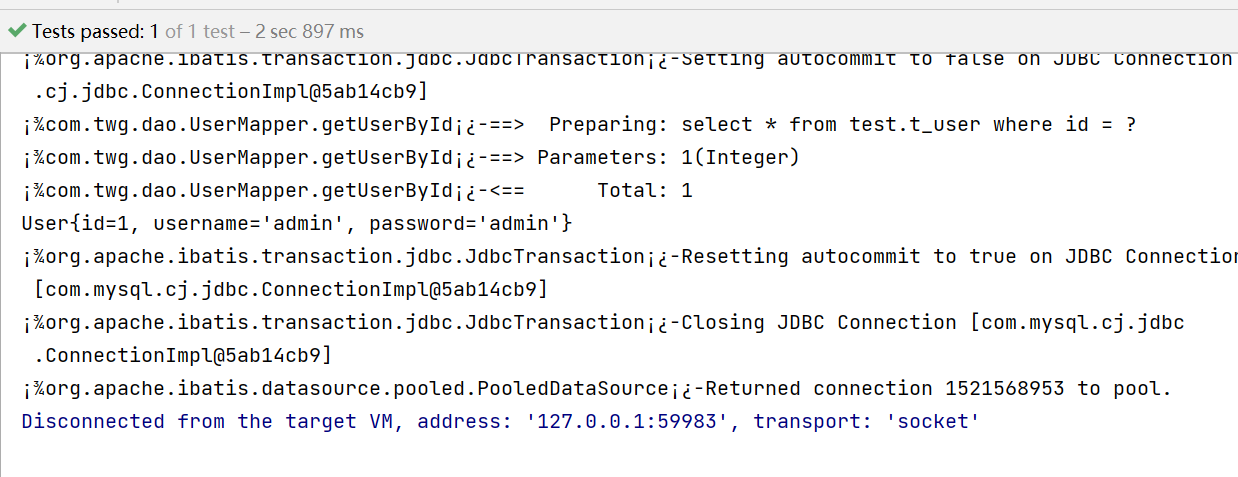
从日志中,我们可以看到,虽然查询了两次,但是只有一条select语句。
失效的情况:
- 查询不同的东西
- 增删改操作,可能会改变数据,缓存也会失效
- 查询不同的mapper
二级缓存
因为一级缓存的作用域太低了,所以出现了二级缓存。——namespace域,全局缓存。
工作机制
- 一个会话查询一条数据,这个数据就会放到一级缓存
- 如果当前会话关闭了,这个会话对应的一级缓存就没了;此时一级缓存的数据就会保存到二级缓存中
- (在同一个mapper)新的会话再次查询信息时,就会直接从二级缓存中获取数据
- 不同的mapper查询出的数据会放到自己对应的缓存中
步骤:
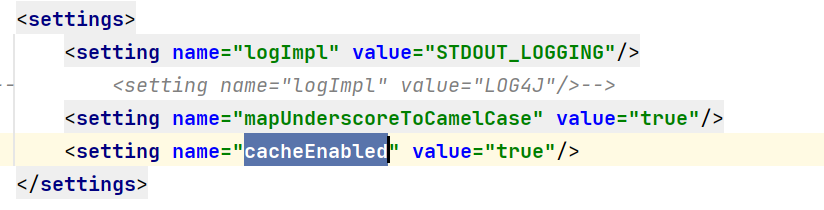
显式地在配置文件中,开启全局缓存
在当前mapper中使用二级缓存
默认情况下,只启用了本地的会话缓存,它仅仅对一个会话中的数据进行缓存。 要启用全局的二级缓存,只需要在你的 SQL 映射文件中添加一行:
1
<cache/>也可以定制其中的参数:
1
2
3
4
5<cache
eviction="FIFO"
flushInterval="60000"
size="512"
readOnly="true"/>测试
1
2
3
4
5
6
7
8
9
10
11
12public void testGetUserById() {
SqlSession sqlSession = MybatisUtils.getSqlSession();
UserMapper mapper = sqlSession.getMapper(UserMapper.class);
System.out.println(mapper.getUserById(1));
sqlSession.close();
SqlSession sqlSession2 = MybatisUtils.getSqlSession();
UserMapper mapper2 = sqlSession2.getMapper(UserMapper.class);
System.out.println("-----------------------");
System.out.println(mapper2.getUserById(1));
sqlSession2.close();
}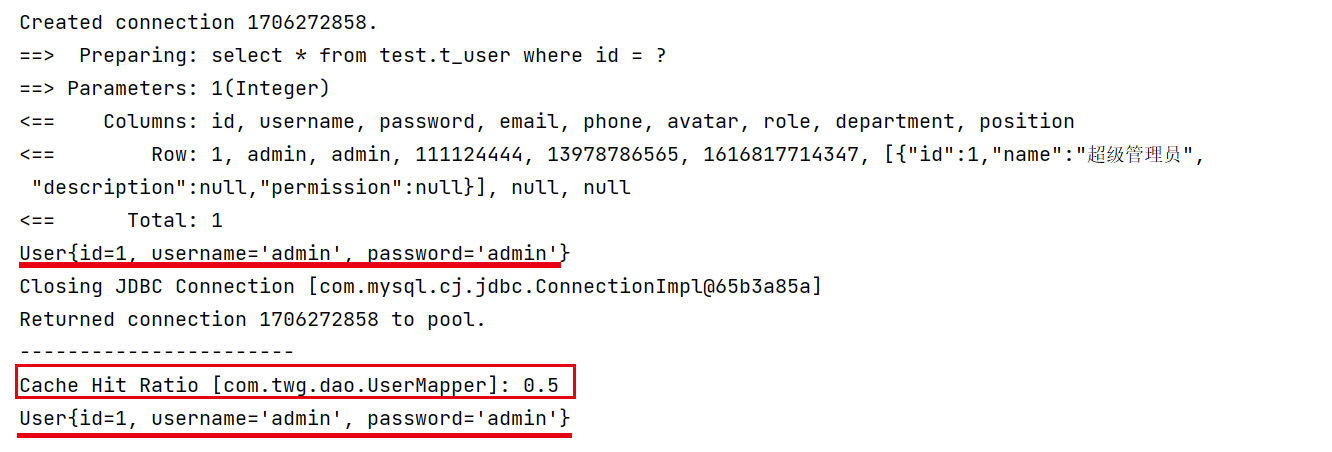
上面的代码中,我创建了两个sqlsession对象,并通过该对象获取中同类型的mapper,当我使用完第一个sqlsession并关闭后,再使用一个新的sqlsession时,可以看到日志中并没有再次查询数据库,说明二级缓存起作用了。
自定义缓存Ehcache
除了上述自定义缓存的方式,你也可以通过实现你自己的缓存,或为其他第三方缓存方案创建适配器,来完全覆盖缓存行为。
导入依赖
1
2
3
4
5
6
7<!-- https://mvnrepository.com/artifact/org.mybatis.caches/mybatis-ehcache -->
<dependency>
<groupId>org.mybatis.caches</groupId>
<artifactId>mybatis-ehcache</artifactId>
<version>1.2.1</version>
</dependency>启用缓存
1
<cache type="org.mybatis.caches.ehcache.EhcacheCache"/>添加ehcache配置文件——ehcache.xml
1
2
3
4
5
6
7
8
9
10
11
12
13
14
15
16
17
18
19
20
21
22
23
24
25
26<?xml version=1.0 encoding=UTF-8 ?>
<ehcache xmlns:xsi=http://www.w3.org/2001/XMLSchema-instance
xsi:noNamespaceSchemaLocation=http://ehcache.org/ehcache.xsd
updateCheck=false>
<diskStore path=./tmpdir/Tmp_EhCache/>
<defaultCache
eternal=false
maxElementsInMemory=10000
overflowToDisk=false
diskPersistent=false
timeToIdleSeconds=1800
timeToLiveSeconds=259200
memoryStoreEvictionPolicy=LRU/>
<cache
name=cloud_user
eternal=false
maxElementsInMemory=5000
overflowToDisk=false
diskPersistent=false
timeToIdleSeconds=1800
timeToLiveSeconds=1800
memoryStoreEvictionPolicy=LRU/>
</ehcache>
本博客所有文章除特别声明外,均采用 CC BY-SA 4.0 协议 ,转载请注明出处!