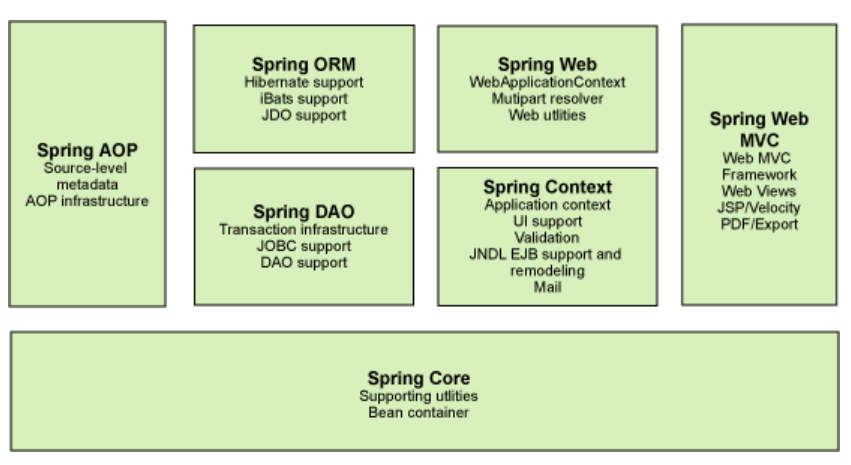
Spring
Java笔记——Spring
Spring理念——简化企业级应用开发的复杂性,使得现有的技术更容易使用,是一个大杂烩,整合了所有的技术框架。
SSM:SpringMVC+Spring+Mybatis
开发文档:Spring Framework Documentation
1 | |
🍑优点
- 开源、免费的框架(容器)
- 轻量级、非入侵式的框架
- 控制反转(IOC),面向切面编程(AOP)
- 支持事务处理,对框架整合的支持
Spring是一个轻量级的IOC和AOP框架
🍇组成
Spring Boot
- 一个快速开发的脚手架
- 基于SpringBoot可以快速开发单个微服务
- 约定大于配置
Spring Cloud
- 是基于Spring Boot实现的
在学习Spring Boot之前需要完全掌握Spring以及SpringMVC。
弊端:配置十分繁琐。
🥝IOC——控制反转
控制反转是一种设计思想,DI(依赖注入)是实现IoC的一种方法,也有人认为DI只是IOC的另一种说法。没有IOC的程序中 , 我们使用面向对象编程 , 对象的创建与对象间的依赖关系完全硬编码在程序中,对象的创建由程序自己控制,控制反转后将对象的创建转移给第三方,个人认为所谓控制反转就是:获得依赖对象的方式反转了。
IOC是Spring框架的核心,使用多种方式完美的实现了IOC,可以使用XML配置,也可以使用注解,新版本的Spring也可以零配置实现IOC。
Spring容器在初始化时先读取配置文件,根据配置文件或元数据创建与组织对象存入容器中,程序使用时再从IOC容器中取出需要的对象。
采用XML方式配置Bean的时候,Bean的定义信息是和实现分离的,而采用注解的方式可以把两者合为一体,Bean的定义信息直接以注解的形式定义在实现类中,从而达到了零配置的目的。
控制反转是一种通过描述(XML或注解)并通过第三方去生产或获取特定对象的方式。在Spring中实现控制反转的是IOC容器,其实现方法是依赖注入(Dependency Injection,DI)。
🥥尝鲜——Hello Spring
添加依赖——spring-webmvc
1
2
3
4
5<dependency>
<groupId>org.springframework</groupId>
<artifactId>spring-webmvc</artifactId>
<version>4.3.7.RELEASE</version>
</dependency>编写实体类——User
1
2
3
4
5
6
7
8
9
10
11
12
13
14
15
16
17
18
19
20
21
22
23
24
25
26
27
28
29
30
31
32
33
34package com.twg.pojo;
/**
* @Author Tang Wuguo
* @Description //TODO $
* @Date $ 2021-7-29$
*/
public class User {
String name;
public User() {
System.out.println("使用无参构造创建User对象");
}
public User(String name) {
System.out.println("使用有参构造");
this.name = name;
}
public String getName() {
return name;
}
public void setName(String name) {
this.name = name;
}
@Override
public String toString() {
return "User{" +
"name='" + name + '\'' +
'}';
}
}编写配置文件——beans.xml
1
2
3
4
5
6
7
8
9
10
11<?xml version="1.0" encoding="UTF-8"?>
<beans xmlns="http://www.springframework.org/schema/beans"
xmlns:xsi="http://www.w3.org/2001/XMLSchema-instance"
xsi:schemaLocation="http://www.springframework.org/schema/beans
https://www.springframework.org/schema/beans/spring-beans.xsd">
<bean id="user" class="com.twg.pojo.User">
<property name="name" value="twg"/>
</bean>
</beans>测试
1
2
3
4
5
6
7
8
9
10
11
12
13
14
15
16
17
18
19package com.twg.pojo;
import org.springframework.context.ApplicationContext;
import org.springframework.context.support.ClassPathXmlApplicationContext;
/**
* @Author Tang Wuguo
* @Description //TODO $
* @Date $ 2021-7-29$
*/
public class TestUser {
public static void main(String[] args) {
ApplicationContext context = new ClassPathXmlApplicationContext("beans.xml");
User user = (User) context.getBean("user");
System.out.println(user);
}
}
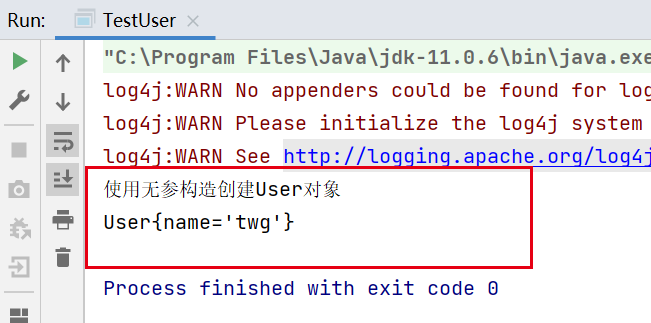
可以看到,通过Spring创建user对象是,通过无参构造来创建的(这是Spring中IOC创建对象的默认方式),而在配置文件中给name属性赋值是通过setter方法实现的。
IOC创建对象的方式
使用无参构造——默认
1
2
3<bean id="user" class="com.twg.pojo.User">
<property name="name" value="twg"/>
</bean>使用有参构造
下标赋值
1
2
3<bean id="user" class="com.twg.pojo.User">
<constructor-arg index="0" value="twg1"/>
</bean>通过指定类型——不推荐
1
2
3<bean id="user" class="com.twg.pojo.User">
<constructor-arg type="java.lang.String" value="twg2"/>
</bean>通过参数名——推荐
1
2
3<bean id="user" class="com.twg.pojo.User">
<constructor-arg name="name" value="twg3"/>
</bean>
🍋Spring的配置
别名——alias
1
<alias name="user" alias="user2"/>beans
1
2
3<bean id="user" class="com.twg.pojo.User" name="user3">
<constructor-arg name="name" value="twg3"/>
</bean>id:bean的唯一表示符
class:bean对象对应的全限定名
name:也是别名,但是可以取多个,可以用逗号、空格以及分号来分割多个别名
import
一般用于团队开发,可以将多个配置文件导入为一个
1
2<import resource="beans1.xml"/>
<import resource="beans2.xml"/>
🍒DI——依赖注入
构造注入
setter注入
- 依赖:bean对象的创建依赖于容器
- 注入:bean对象中的所有属性,由容器来注入
扩展方式注入
p命名空间——相当与set注入
现在配置文件中,加入对p命名空间的支持:
1
xmlns:p="http://www.springframework.org/schema/p"就可以在bean标签中使用p:name来给name赋值了。
1
<bean id="user2" class="com.twg.pojo.User" p:name="twg"/>c命名空间——相当于构造注入
与上面的用法类似:
1
xmlns:c="http://www.springframework.org/schema/c"
1
<bean id="user3" class="com.twg.pojo.User" c:name="twg_by_user3"/>
🌽Bean作用域
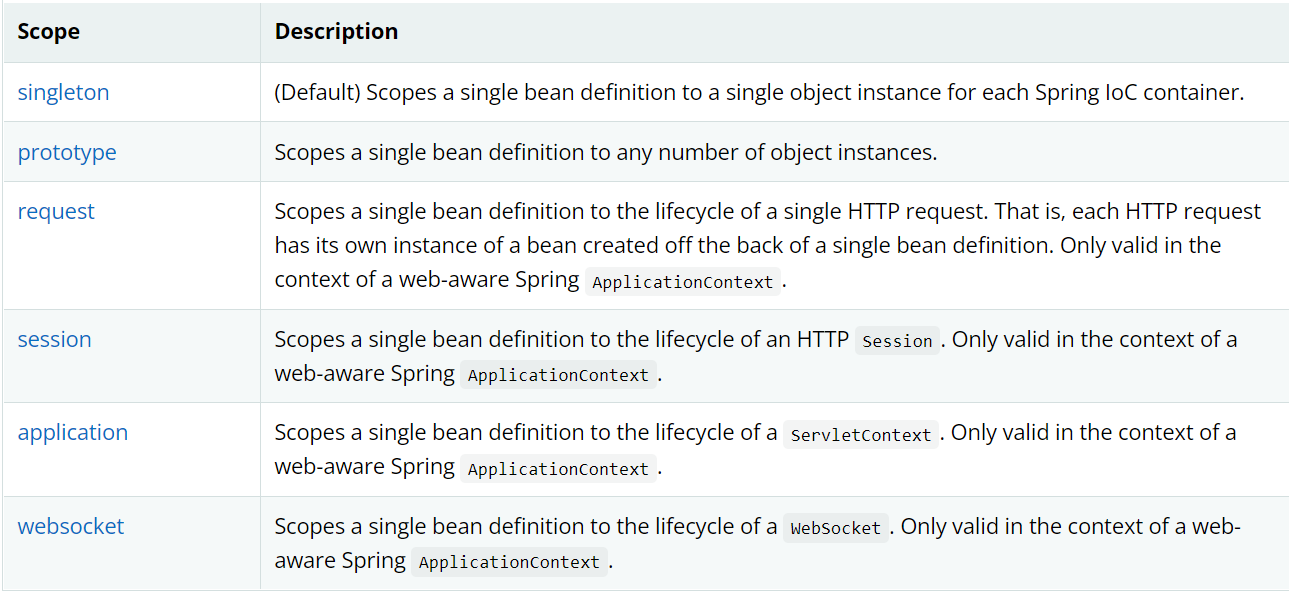
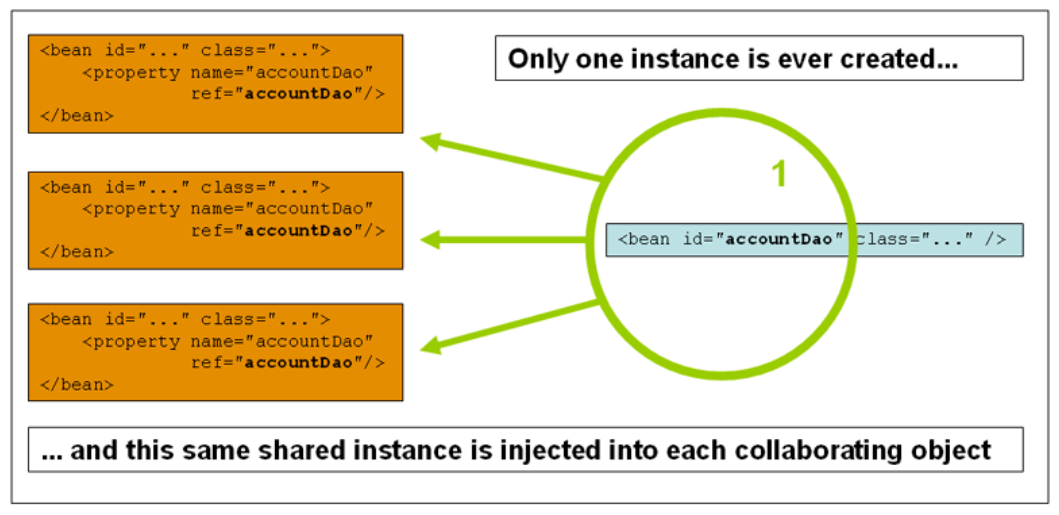
singleton
1
2
3
4<bean id="accountService" class="com.something.DefaultAccountService"/>
<!-- the following is equivalent, though redundant (singleton scope is the default) -->
<bean id="accountService" class="com.something.DefaultAccountService" scope="singleton"/>prototype
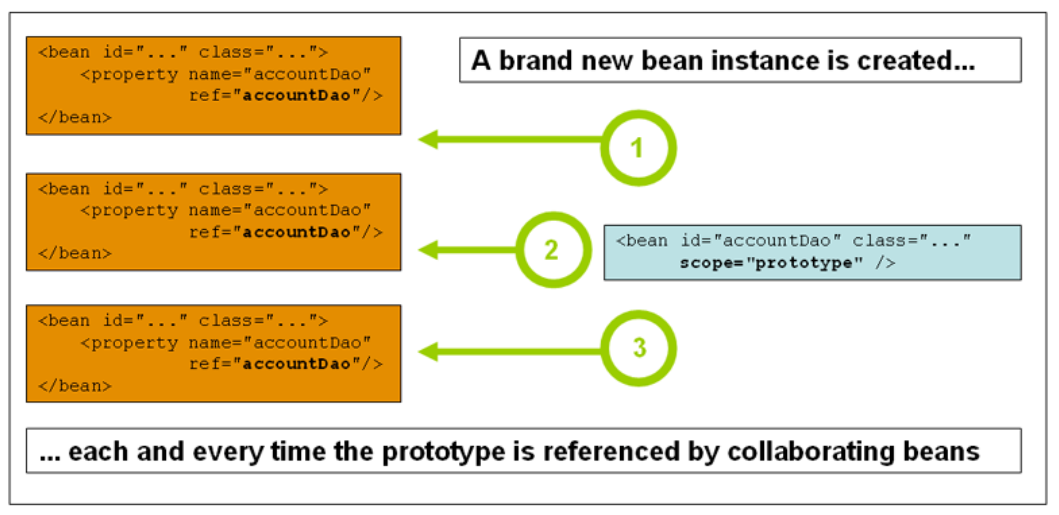
1
<bean id="accountService" class="com.something.DefaultAccountService" scope="prototype"/>
🧇自动装配Autowired
Spring中的三种装配方式:
- 在xml中显示装配
- 在Java中显示配置
- 隐式——自动装配bean
使用注解
1 | |
1 | |
1 | |
@Autowire:使用在属性名上,便会自动查找IOC容器中对应的(byName)对象,并装配。
@Qualifier:当我们使用的autowire注解,同时在IOC容器中找不到要装配的bean时(可能是因为有多个bean,而且他们的name并不与Person类中属性名一样),这是就需要使用@Qualifier(value=”dog02”)来手动指定,需要装配的bean。
@Nullable:使用在某个字段前面,说明该字段可以为null。等价于 @Autowire(required = false)
@Resource:与@Autowire的功能类似,不过其机制相反。@Resource,首先通过byType——类型看有没有符合的bean,如果有多个则看bean的name。如果两个都不符合就会报错了,这时候就需要手动的去指定要装配的bean(例如:@Resource(name=”dog02”)
🧀使用注解开发
使用之前:
导入AOP依赖
导入contex约束,增加注解支持
1
2
3
4
5
6
7
8
9
10
11
12
13
14<?xml version="1.0" encoding="UTF-8"?>
<beans xmlns="http://www.springframework.org/schema/beans"
xmlns:xsi="http://www.w3.org/2001/XMLSchema-instance"
xmlns:context="http://www.springframework.org/schema/context"
xsi:schemaLocation="http://www.springframework.org/schema/beans
https://www.springframework.org/schema/beans/spring-beans.xsd
http://www.springframework.org/schema/context
https://www.springframework.org/schema/context/spring-context.xsd">
<--!指定要扫描的包,这个包下的注解就会生效-->
<context:component-scan base-package="com.twg.pojo"/>
<context:annotation-config/>
</beans>
@Component:组件 ,修饰一个class,等价于
- dao 【@Repository】
- service 【@Service】
- controller 【@Controller】
- bean 【@ComPonent】
- 功能一样,将类添加到Spring容器中
@Value:(“参数”) 自动赋值
@Scope:(“参数”) 设置模式 作用域
@Import:(“类”) 将另外一个类合并
注解更加麻烦 xml容易维护
最好的方式:xml->bean 注解->属性的注入
🍥使用JavaConfig开发
除了使用xml配置文件式,还可以通过JavaConfig代替配置文件,使用纯Java的来配置。
1 | |
纯Java的配置方式 SpringBoot前提34
1 | |
1 | |
1 | |
🍦代理模式——Spring AOP的底层
角色:
- 抽象主题角色
- 具体主题角色
- 代理角色
分类:
静态代理
动态代理:从静态代理会发现——每个代理类只能为一个接口服务,这样程序开发中必然会产生许多的代理类。所以我们想办法通过一个代理类完成全部的代理功能,那么我们就需要用动态代理。动态代理是在运行时,通过反射机制实现动态代理,并且能够代理各种类型的对象。
要实现动态代理,需要
java.lang.reflect.InvocationHandler接口和java.lang.reflect.Proxy类的支持。编写抽象主题接口
1
2
3
4
5
6
7public interface AbstractHost {
/**
* 房东买房
*/
public void sell();
}编写具体主题类
1
2
3
4
5
6
7public class Host implements AbstractHost{
@Override
public void sell() {
System.out.println("房东卖出房子");
}
}编写动态代理类——实现了InvocationHandler
编写一个可以获取代理实例的方法,并重写invoke方法
1
2
3
4
5
6
7
8
9
10
11
12
13
14
15
16
17
18
19
20
21
22
23public class ProxyHouse implements InvocationHandler {
private Object target;
public Object newProxyInstance(Object target){
this.target = target;
Object res = Proxy.newProxyInstance(target.getClass().getClassLoader(),
target.getClass().getInterfaces(), this);
return res;
}
@Override
public Object invoke(Object proxy, Method method, Object[] args) throws Throwable {
Object ret;
try{
ret = method.invoke(target,args);
}catch (Exception e){
log.error("调用{}.{}发生异常", target.getClass().getName(), method.getName(), e);
throw e;
}
return ret;
}
}测试
1
2
3
4
5
6
7
8public class Client {
public static void main(String[] args) {
ProxyHouse proxyHouse = new ProxyHouse();
AbstractHost host = (AbstractHost)proxyHouse.newProxyInstance(new Host());
host.sell();
}
}
动态代理步骤:
抽象主题类
具体主题类
动态代理类
只能代理接口,不支持抽象类,代理类需要实现InvocationHandler,实现invoke方法。invoke方法就是调用被代理接口的所有方法时需要调用的,返回的值是被代理接口的一个实现类。
优点:
- 职责清晰:具体角色是实现具体的业务逻辑,不用关心其他非本职责的事务,通过后期的代理完成一件事务,代码清晰。
- 高扩展性:可以扩展多个实现了抽象角色的类,这样,哪怕代理类不做修改仍然可以继续使用。还可以通过给代理类增加额外的功能来扩展委托类的功能,这样做我们只需要修改代理类而不需要再修改委托类,同样符合开闭原则。
- 智能性:动态代理的智能化
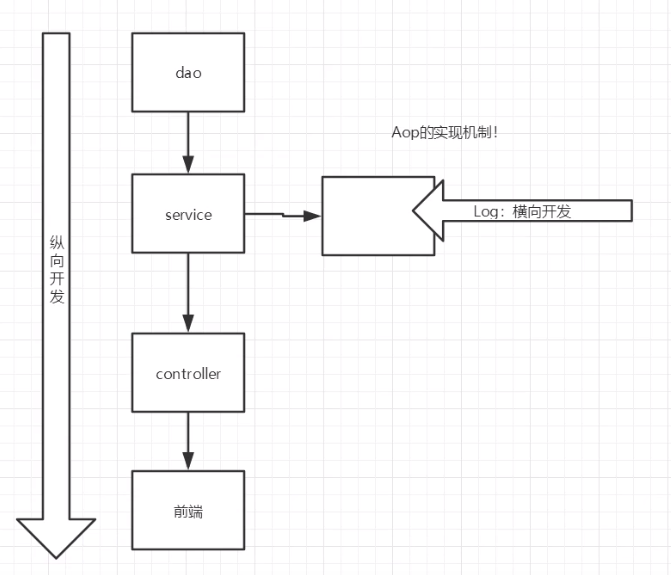
🍆AOP
Spring中实现AOP
首先加入依赖
1 | |
三种实现方式
使用spring接口实现
1
2
3
4
5
6
7
8
9<bean id="userService" class="com.twg.service.UserServiceImpl"/>
<bean id="log" class="com.twg.log.Log"/>
<bean id="afterLog" class="com.twg.log.AfterLog"/>
<aop:config>
<aop:pointcut id="pointCut" expression="execution(* com.twg.service.UserServiceImpl.*(..))"/>
<aop:advisor advice-ref="log" pointcut-ref="pointCut"/>
<aop:advisor advice-ref="afterLog" pointcut-ref="pointCut"/>
</aop:config>1
2
3
4
5
6
7
8
9
10
11public class Client {
public static void main(String[] args) {
ApplicationContext context = new ClassPathXmlApplicationContext("applicationContext.xml");
// 动态代理的是接口!
UserService bean = (UserService)context.getBean("userService");
bean.add();
}
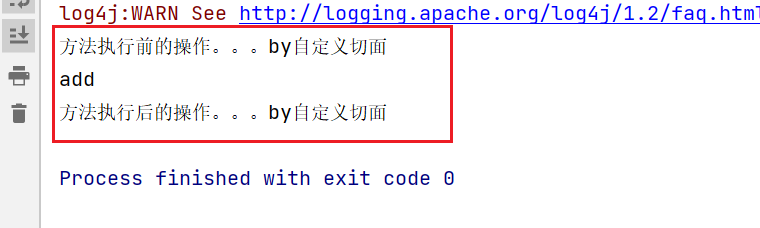
}自定义切面实现
步骤:
编写自定义切面类
1
2
3
4
5
6
7
8
9
10public class MyAspect {
public void before(){
System.out.println("方法执行前的操作。。。by自定义切面");
}
public void after(){
System.out.println("方法执行后的操作。。。by自定义切面");
}
}修改配置文件
1
2
3
4
5
6
7
8
9<bean id="myAspect" class="com.twg.aspect.MyAspect"/>
<aop:config>
<aop:aspect ref="myAspect">
<aop:pointcut id="point" expression="execution(* com.twg.service.UserServiceImpl.*(..))"/>
<aop:before method="before" pointcut-ref="point"/>
<aop:after method="after" pointcut-ref="point"/>
</aop:aspect>
</aop:config>测试
1
2
3
4
5
6
7
8
9
10public class Client {
public static void main(String[] args) {
ApplicationContext context = new ClassPathXmlApplicationContext("applicationContext.xml");
// 动态代理的是接口!
UserService bean = (UserService)context.getBean("userService");
bean.add();
}
}
注解实现——相当于对方法2的简化
编写切片类
1
2
3
4
5
6
7
8
9
10
11
12
13
14
15
16
17
18
19
20
21
22
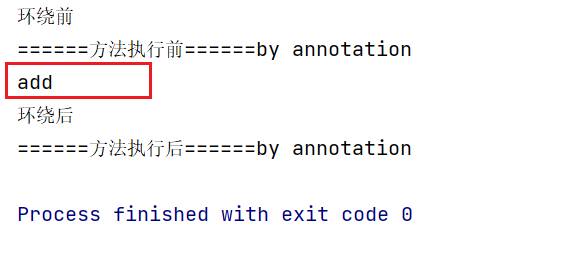
23@Aspect //标注这个类是一个切面
public class AspectByAnno {
@Before("execution(* com.twg.service.UserServiceImpl.*(..))")
public void before(){
System.out.println("======方法执行前======by annotation");
}
@After("execution(* com.twg.service.UserServiceImpl.*(..))")
public void after(){
System.out.println("======方法执行后======by annotation");
}
//在环绕增强中,可以给定一个参数,代表我们要处理切入的点
@Around("execution(* com.twg.service.UserServiceImpl.*(..))")
public void around(ProceedingJoinPoint jp) throws Throwable {
System.out.println("环绕前");
// 执行方法
Object proceed = jp.proceed();
System.out.println("环绕后");
}
}测试
🍀Mybatis
导入jar包
junit, mybatis, mysql, spring, aop, mybatis-spring
1
2
3
4
5
6
7
8
9
10
11
12
13
14
15
16
17
18
19
20
21
22
23
24
25
26
27
28
29
30
31
32
33
34
35
36
37
38
39
40
41
42
43
44<dependencies>
<dependency>
<groupId>junit</groupId>
<artifactId>junit</artifactId>
<version>4.12</version>
</dependency>
<dependency>
<groupId>mysql</groupId>
<artifactId>mysql-connector-java</artifactId>
<version>8.0.20</version>
</dependency>
<dependency>
<groupId>org.mybatis</groupId>
<artifactId>mybatis</artifactId>
<version>3.5.6</version>
</dependency>
<dependency>
<groupId>org.springframework</groupId>
<artifactId>spring-webmvc</artifactId>
<version>5.3.9</version>
</dependency>
<dependency>
<groupId>org.springframework</groupId>
<artifactId>spring-jdbc</artifactId>
<version>5.3.9</version>
</dependency>
<dependency>
<groupId>org.aspectj</groupId>
<artifactId>aspectjweaver</artifactId>
<version>1.9.8.M1</version>
</dependency>
<dependency>
<groupId>org.mybatis</groupId>
<artifactId>mybatis-spring</artifactId>
<version>2.0.2</version>
</dependency>
</dependencies>配置mybatis
实体类
1
2
3
4
5
6@Data
public class Vip {
private int id;
private String name;
private int wallet;
}核心配置文件——mybatis-config.xml
1
2
3
4
5
6
7
8
9
10
11
12
13
14
15
16
17
18
19
20
21
22
23
24
25
26<?xml version="1.0" encoding="UTF-8" ?>
<!DOCTYPE configuration
PUBLIC "-//mybatis.org//DTD Config 3.0//EN"
"http://mybatis.org/dtd/mybatis-3-config.dtd">
<configuration>
<typeAliases>
<package name="com.twg.pojo"/>
</typeAliases>
<environments default="development">
<environment id="development">
<transactionManager type="JDBC"/>
<dataSource type="POOLED">
<property name="driver" value="com.mysql.jdbc.Driver"/>
<property name="url" value="jdbc:mysql://localhost:3306/test?useSSL=true&useUnicode=true&characterEncoding=UTF-8&serverTimezone=UTC"/>
<property name="username" value="root"/>
<property name="password" value="123456"/>
</dataSource>
</environment>
</environments>
<mappers>
<mapper class="com.twg.mapper.VipMapper"/>
</mappers>
</configuration>编写接口
1
2
3public interface VipMapper {
public List<Vip> selectAll();
}mapper.xml
1
2
3
4
5
6
7
8
9<?xml version="1.0" encoding="UTF-8" ?>
<!DOCTYPE mapper
PUBLIC "-//mybatis.org//DTD Mapper 3.0//EN"
"http://mybatis.org/dtd/mybatis-3-mapper.dtd">
<mapper namespace="com.twg.mapper.VipMapper">
<select id="selectAll" resultType="vip">
select * from test.vip
</select>
</mapper>测试
🥨整合Mybatis
配置
1
2
3
4
5
6
7
8
9
10
11
12
13
14
15
16
17
18
19
20
21
22
23
24
25
26
27
28
29
30
31
32<?xml version="1.0" encoding="UTF-8"?>
<beans xmlns="http://www.springframework.org/schema/beans"
xmlns:xsi="http://www.w3.org/2001/XMLSchema-instance"
xmlns:context="http://www.springframework.org/schema/context"
xmlns:aop="http://www.springframework.org/schema/aop"
xsi:schemaLocation="http://www.springframework.org/schema/beans
https://www.springframework.org/schema/beans/spring-beans.xsd
http://www.springframework.org/schema/aop
https://www.springframework.org/schema/aop/spring-aop.xsd">
<bean id="dataSource" class="org.springframework.jdbc.datasource.DriverManagerDataSource">
<property name="driverClassName" value="com.mysql.jdbc.Driver"/>
<property name="url" value="jdbc:mysql://localhost:3306/test?useSSL=true&useUnicode=true&characterEncoding=UTF-8&serverTimezone=UTC"/>
<property name="username" value="root"/>
<property name="password" value="123456"/>
</bean>
<bean id="sqlSessionFactory" class="org.mybatis.spring.SqlSessionFactoryBean">
<property name="dataSource" ref="dataSource"/>
<property name="configLocation" value="mybatis-config.xml"/>
<property name="mapperLocations" value="classpath:com/twg/mapper/*.xml"/>
</bean>
<bean id="sqlSession" class="org.mybatis.spring.SqlSessionTemplate">
<constructor-arg index="0" ref="sqlSessionFactory"/>
</bean>
<bean id="vipMapper" class="com.twg.mapper.VipMapperImpl">
<property name="sqlSessionTemplate" ref="sqlSession"/>
</bean>
</beans>mapperImpl
1
2
3
4
5
6
7
8
9
10
11
12
13
14public class VipMapperImpl implements VipMapper {
private SqlSessionTemplate sqlSessionTemplate;
public void setSqlSessionTemplate(SqlSessionTemplate sqlSessionTemplate) {
this.sqlSessionTemplate = sqlSessionTemplate;
}
@Override
public List<Vip> selectAll() {
VipMapper mapper = sqlSessionTemplate.getMapper(VipMapper.class);
return mapper.selectAll();
}
}测试
1
2
3
4
5
6
7
8
9
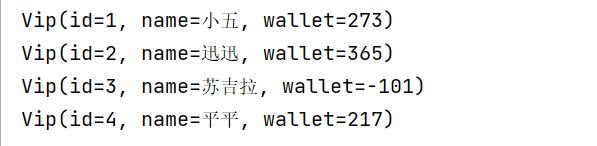
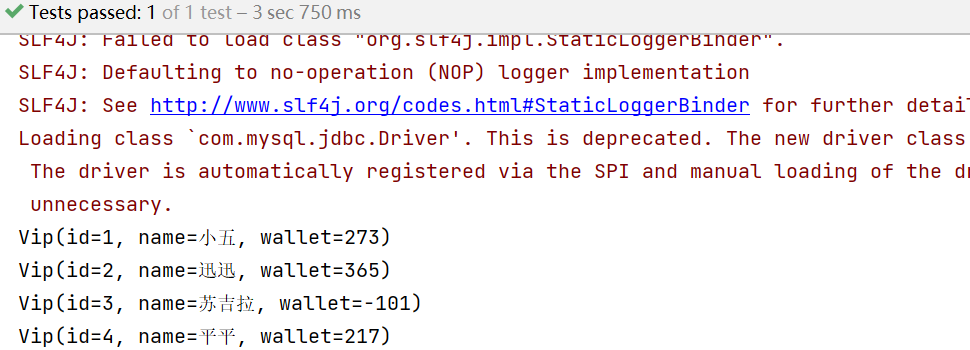
10@Test
public void testMybatisSpring(){
ApplicationContext context = new ClassPathXmlApplicationContext("spring-dao.xml");
VipMapper vipMapper = context.getBean("vipMapper", VipMapper.class);
List<Vip> vips = vipMapper.selectAll();
for (Vip vip : vips) {
System.out.println(vip);
}
}
方式二:
1 | |
1 | |
1 | |
通过这种方法,我们不需要SqlSessionTemplate成员变量来getMapper。=,由于这里继承了一个SqlSessionDaoSupport,通过其中的getSqlSession()便可以得到一个SqlSession。
声明式事务
事物?
把一组业务当成一个业务来做,要么都成功,要么失败;涉及数据的一致性问题。
事物ACID原则
原子性;一致性;隔离性;持久性
Spring中的事物
1 | |
本博客所有文章除特别声明外,均采用 CC BY-SA 4.0 协议 ,转载请注明出处!